


What is Burp Suite?

4
Burp Suite ek powerful web application security testing tool hai jo hackers, bug bounty hunters aur penetration testers use karte hain websites ki vulnerabilities dhoondhne ke liye.
Is tool ka main kaam:
- HTTP Requests aur Responses ko inspect karna
- Website traffic capture karna
- Vulnerabilities detect karna
- Manual aur automated testing karna
Agar aap Web Hacking ya Bug Bounty seekh rahe ho, to Burp Suite sabse important tools me se ek hai.
Burp Suite Architecture
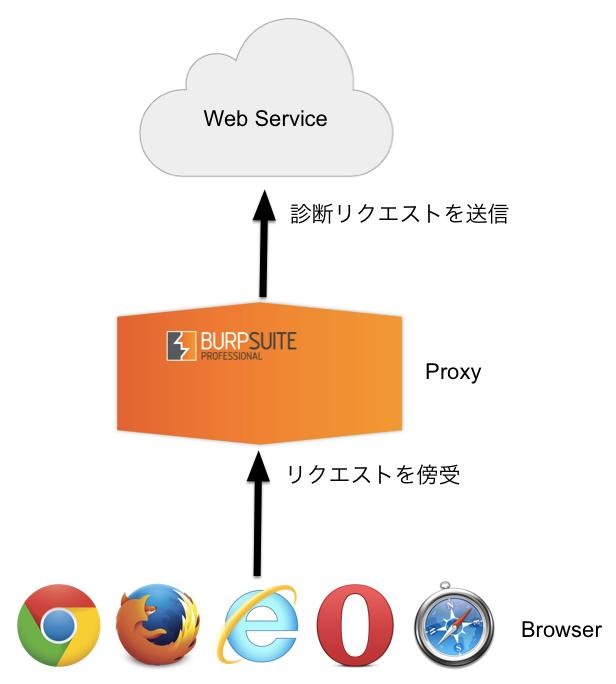
Burp Suite Kaise Work Karta Hai?
4
Simple Workflow
Browser
↓
Burp Suite Proxy
↓
Target Website
Yahan Burp middle-man ki tarah kaam karta hai.
Process:
- Browser request bhejta hai
- Burp request intercept karta hai
- Tester request modify kar sakta hai
- Modified request website ko send hoti hai
- Response wapas Burp me aata hai
- Phir browser me display hota hai
Isi wajah se Burp powerful testing tool mana jata hai.
Why Burp Suite Is So Popular?
Main Features
| Feature | Work |
| Proxy | Traffic capture |
| Repeater | Manual testing |
| Intruder | Payload attacks |
| Decoder | Encode/Decode |
| Comparer | Compare requests |
| Scanner | Automated vulnerability scan |
Burp Suite Editions
Community vs Professional
Burp Suite Community vs Professional
Comparison of major features between free and paid versions.
Community
Professional
00111ProxyRepeaterIntruderScannerContent DiscoveryTask Scheduler
| Feature | Community | Professional |
| Proxy | ✅ | ✅ |
| Repeater | ✅ | ✅ |
| Intruder | ✅ | ✅ |
| Scanner | ❌ | ✅ |
| Content Discovery | ❌ | ✅ |
| Task Scheduler | ❌ | ✅ |
Community Edition
- Free version
- Beginners ke liye best
- Learning aur practice ke liye perfect
Professional Edition
- Paid version
- Automated scanner
- Faster testing
- Advanced automation tools
Burp Suite Installation
Java Requirement
OpenJDK> Burp Suite Java language me bana hua hai.
Isliye system me Java installed hona chahiye.
Check Java Version
java -version
Example output:
openjdk version “21.0.2”
Agar version show ho raha hai to Java installed hai.
Starting Burp Suite
Command Line Se Run Karna
java -jar burpsuite.jar
Command Breakdown
| Command | Meaning |
| java | Java runtime start |
| -jar | JAR file run |
| burpsuite.jar | Burp file |
Burp Suite Memory Optimization
RAM Allocation Kyu Important Hai?


4
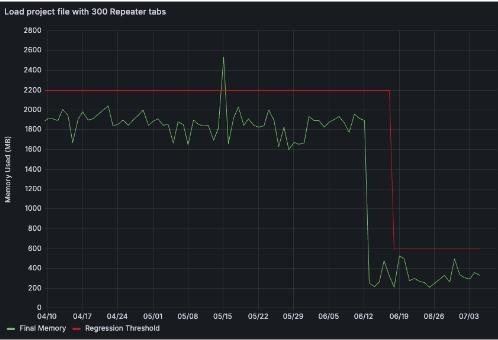
Burp Suite thousands of HTTP requests store karta hai.
Agar RAM kam hogi:
- Burp slow ho jayega
- Crash ho sakta hai
- Heap memory errors aayenge
Recommended RAM Settings
Recommended Burp Suite RAM Allocation
Suggested Xmx memory settings based on system RAM.
0 GB2 GB4 GB6 GB8 GB4 GB8 GB16 GB32 GB+
Recommended Launch Commands
2 GB RAM Allocation
java -Xmx2G -jar burpsuite.jar
4 GB RAM Allocation
java -Xmx4G -jar burpsuite.jar
Understanding Java Heap Memory
Java applications heap memory use karti hain.
Xmx=Maximum Heap MemoryXmx = \text{Maximum Heap Memory}Xmx=Maximum Heap Memory
Burp me store hota hai:
- Proxy History
- Requests
- Responses
- Site Maps
- Scanner Data
IPv4 Error Fix
Common Error
Kabhi-kabhi Burp me error aata hai:
Permission denied: connect
Reason:
Java IPv6 use karne ki koshish karta hai.
IPv4 Force Command
java -Xmx2G -Djava.net.preferIPv4Stack=true -jar burpsuite.jar
Burp Suite Request Flow
4
HTTP Traffic Example
Browser Request
↓
Burp Intercepts
↓
Modify Request
↓
Send To Website
↓
Receive Response
↓
Browser Display
Important Burp Suite Tools
1. Proxy
Traffic intercept karta hai.
2. Repeater
Manual testing ke liye use hota hai.
Example:
- SQL Injection testing
- XSS testing
3. Intruder
Automated payload attacks ke liye.
4. Decoder
Encoding aur decoding.
5. Comparer
Requests compare karta hai.
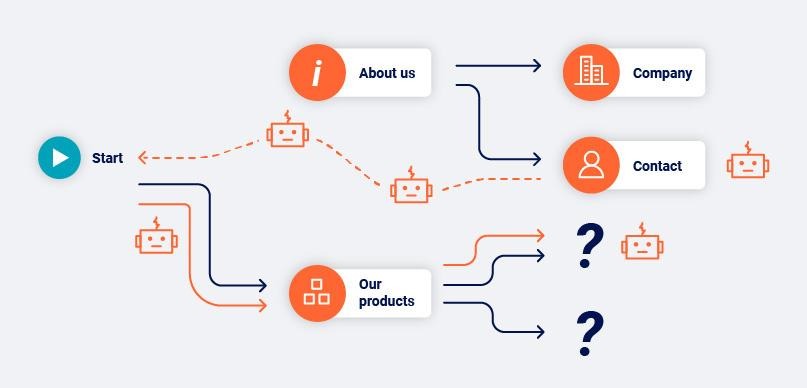
Burp Suite Learning Path
Beginner Roadmap
Burp Suite Learning Roadmap
Suggested progression for beginners learning web application security testing.
Suggested Order
- Proxy samjho
- HTTP requests seekho
- Repeater use karo
- Intruder practice karo
- TryHackMe labs solve karo
- Bug bounty start karo
Kali Linux & Parrot OS Support
Kali Linux aur Parrot OS dono me Burp perfectly kaam karta hai.
Modern systems me:
- OpenJDK fully supported hai
- Oracle Java zaroori nahi
- Burp Community beginners ke liye enough hai
Final Thoughts
Burp Suite web application security testing ka backbone mana jata hai.
Agar aap:
- Bug bounty
- Penetration testing
- Web hacking
- Cybersecurity
seekhna chahte ho, to Burp Suite mandatory tool hai.
Beginners ke liye Community Edition best hai aur practice ke saath aap advanced web security testing expert ban sakte ho.
second veiw
Burp Suite Complete Beginner Guide – Web Security Testing Tool
Introduction to Burp Suite
Burp Suite ek powerful web application security testing tool hai jo cybersecurity professionals, bug bounty hunters aur ethical hackers use karte hain. Iska main purpose browser aur website ke beech hone wale HTTP/HTTPS traffic ko intercept aur analyze karna hota hai.
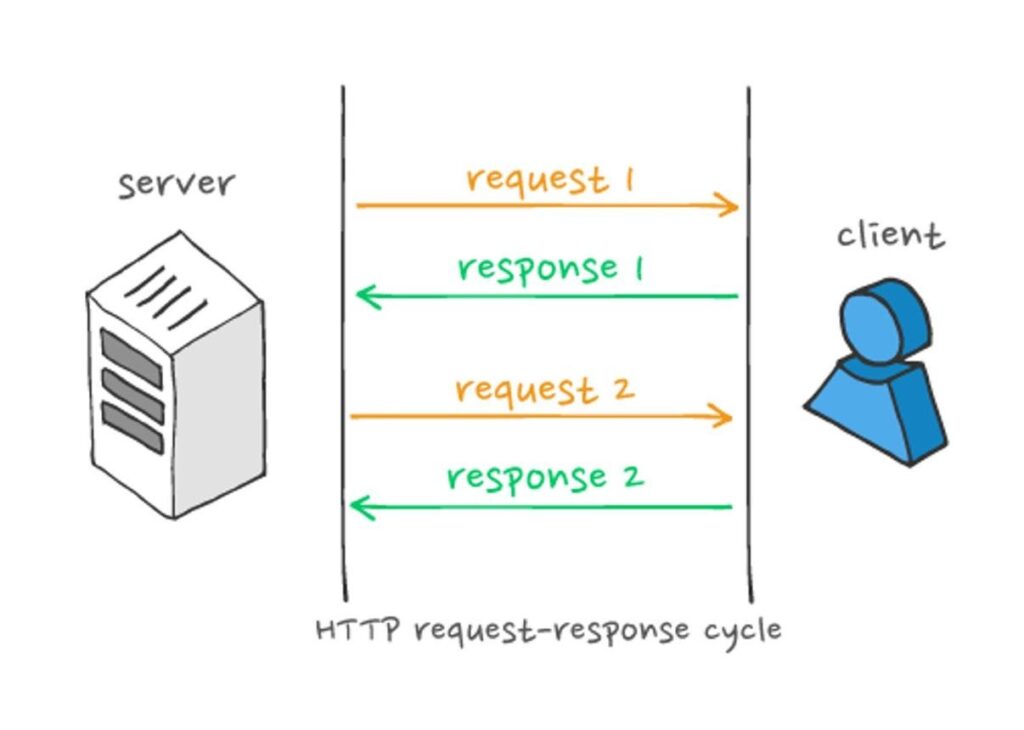
Normally internet traffic ka flow hota hai:
Browser → Website
Lekin Burp Suite use karne par flow ban jata hai:
Browser → Burp Suite → Website
Is process ki wajah se Burp Suite:
- Requests aur responses ko capture kar sakta hai
- Traffic modify kar sakta hai
- Hidden parameters detect kar sakta hai
- Vulnerabilities test kar sakta hai
Isi wajah se Burp Suite web penetration testing ka sabse important tool mana jata hai.
Burp Suite Editions
Burp Suite mainly 3 editions me available hai:
1. Community Edition
Community Edition free version hai aur beginners ke liye best option mana jata hai. Isme:
- Proxy
- Repeater
- Intruder
- Decoder
jaise important tools available hote hain.
Ye version learning, TryHackMe labs aur basic penetration testing ke liye enough hota hai.
2. Professional Edition
Professional Edition paid version hai jo advanced penetration testers aur bug bounty hunters use karte hain.
Isme additional features milte hain:
- Automated Vulnerability Scanner
- Faster Intruder
- Project Saving
- Report Generation
- Burp Collaborator
- Extensions Support
3. Enterprise Edition
Enterprise Edition companies aur DevSecOps environments ke liye design ki gayi hai. Ye automated scanning aur continuous vulnerability monitoring provide karta hai.
Burp Suite Installation
Windows Installation
Windows users simply official installer download karke .exe file run kar sakte hain aur installation wizard follow kar sakte hain.
macOS Installation
macOS users .dmg installer download karke Burp Suite ko Applications folder me drag kar sakte hain. Burp Suite Apple Silicon devices jaise MacBook Air M1 me bhi properly support karta hai.
Linux Installation
Linux aur Kali users terminal se install kar sakte hain:
sudo apt install burpsuite
Manual installer ke liye:
chmod +x burpsuite_community_linux.sh
./burpsuite_community_linux.sh
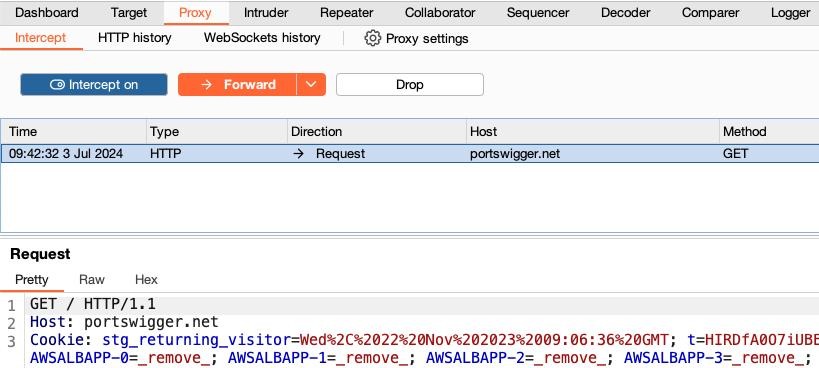
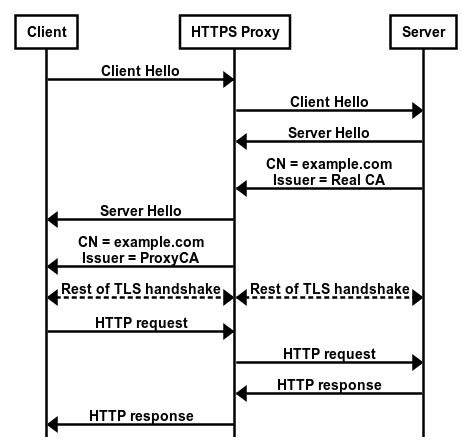
Burp Suite Proxy – Core Feature
Burp Suite ka sabse important feature uska Proxy Tool hai.
Proxy browser aur web server ke beech middleman ki tarah kaam karta hai.
Example request:
POST /login
username=sajid
password=123456
Burp Proxy ke through aap:
- Request intercept kar sakte ho
- Parameters modify kar sakte ho
- Cookies inspect kar sakte ho
- Requests forward ya drop kar sakte ho
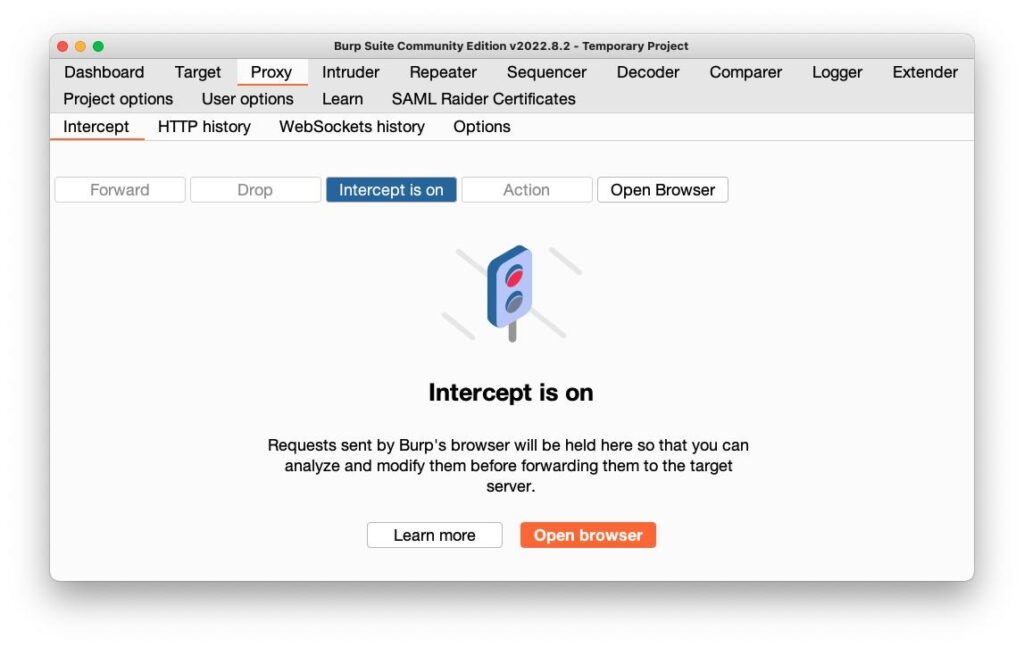
Agar “Intercept is ON” hota hai to Burp requests ko temporarily rok deta hai jab tak user manually forward na kare.
Ye feature web application testing ka foundation mana jata hai.
HTTP History & Traffic Logging
Burp Suite automatically captured traffic ko HTTP History me save karta rehta hai. Isse tester:
- Previous requests analyze kar sakta hai
- Responses inspect kar sakta hai
- Repeat testing kar sakta hai
Even agar intercept OFF ho tab bhi Burp traffic log karta rehta hai.
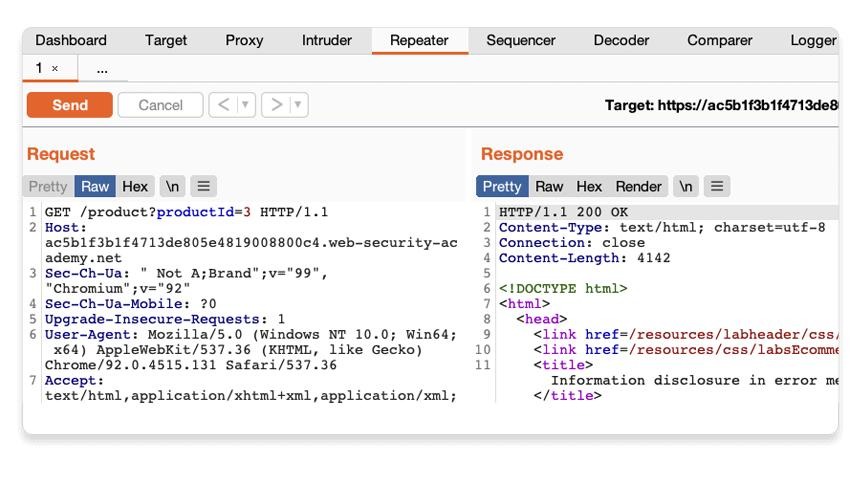
Repeater Tool
Repeater Tool manual testing ke liye use hota hai.
Is tool ka purpose same request ko baar-baar bhejna aur response analyze karna hota hai.
Example:
GET /product?id=1
Tester manually parameters modify kar sakta hai:
GET /product?id=2
GET /product?id=3
GET /product?id=’ OR 1=1–
Repeater SQL Injection, XSS aur parameter testing me bahut useful hota hai.
Intruder Tool
Intruder automated testing aur fuzzing ke liye use hota hai.
Iske common use cases:
- Brute force attacks
- Payload testing
- Parameter discovery
- Fuzzing
Example passwords:
123456
admin
password
qwerty
Community Edition me Intruder speed limited hoti hai jabki Professional Edition faster hota hai.
Decoder Tool
Decoder Tool encoding aur decoding operations perform karta hai.
Supported formats:
- Base64
- URL Encoding
- Hex Conversion
Example:
SGVsbG8=
Decode karne par output:
Hello
Comparer Tool
Comparer Tool do requests ya responses compare karne ke liye use hota hai.
Ye useful hota hai:
- Authentication testing
- Session analysis
- Privilege escalation testing
Comparer word-level aur byte-level comparison provide karta hai.
Sequencer Tool
Sequencer session tokens aur cookies ki randomness test karta hai.
Ye analyze karta hai ki:
- Session IDs predictable hain ya nahi
- CSRF tokens secure hain ya nahi
Weak randomness serious security issue ban sakti hai.
Burp Extensions & BApp Store
Burp Suite extensions support karta hai jisse additional functionality add ki ja sakti hai.
Supported languages:
- Java
- Python (Jython)
- Ruby (JRuby)
BApp Store Burp ka extensions marketplace hai jahan se:
- Logging tools
- Automation plugins
- Payload extensions
download kiye ja sakte hain.
Popular extension:
- Logger++
Target Tab & Site Map
Target Tab Burp ka reconnaissance center hota hai.
Jab user browser se website browse karta hai, Burp automatically Site Map create karta hai.
Example structure:
/home
/login
/profile
/admin
/api
Site Map:
- Website structure show karta hai
- Hidden endpoints detect karta hai
- Attack surface identify karta hai
Real penetration testing me hidden endpoints vulnerabilities ka source ban sakte hain.
Scope Settings
Scope define karta hai ki Burp kis target ko monitor kare.
Example:
In Scope:
http://target-site.com
Out of Scope:
google.com
youtube.com
Scope use karne se unnecessary traffic ignore hota hai aur testing organized rehti hai.
Configuring Firefox with FoxyProxy
Burp Proxy use karne ke liye browser ko Burp ke saath connect karna padta hai.
Firefox me generally FoxyProxy extension use hoti hai.
Configuration:
- IP Address: 127.0.0.1
- Port: 8080
Yahan:
- 127.0.0.1 local machine ko represent karta hai
- 8080 Burp ka default proxy port hota hai
Setup complete hone ke baad browser traffic Burp ke through pass hone lagti hai.
Burp Suite Dashboard
Burp launch hone ke baad Dashboard open hota hai jisme:
- Tasks
- Event Logs
- Activity Panels
- Notifications
show hote hain.
Dashboard initially confusing lag sakta hai lekin regular practice ke baad easy ho jata hai.
Burp Suite Navigation
Burp interface multiple modules me divided hota hai:
- Dashboard
- Target
- Proxy
- Intruder
- Repeater
Proxy module ke andar sub-tabs hote hain:
- Intercept
- HTTP History
- WebSockets
- Options
Keyboard shortcuts bhi available hote hain:
Ctrl + Shift + P → Proxy
Ctrl + Shift + R → Repeater
Ctrl + Shift + I → Intruder
Ye workflow ko fast banate hain.
Burp Suite Settings
Burp me do types ki settings hoti hain:
User Settings
Permanent settings hoti hain jo har session me apply hoti hain.
Example:
- Theme
- Font size
- Proxy listeners
Project Settings
Current project/session ke liye hoti hain.
Example:
- Scope
- Session handling
- Proxy rules
Community Edition me project saving available nahi hoti.
Why Burp Suite Is Important?
Burp Suite web application penetration testing ka backbone mana jata hai.
Is tool ki help se tester:
- HTTP traffic inspect kar sakta hai
- Authentication test kar sakta hai
- APIs analyze kar sakta hai
- Vulnerabilities identify kar sakta hai
Agar aap:
- Bug Bounty
- Web Hacking
- API Testing
- Ethical Hacking
seekhna chahte hain, to Burp Suite ek mandatory tool hai.
Best Learning Method
Burp Suite ko sirf theory padhkar master nahi kiya ja sakta.
Best learning approach:
- Burp install karo
- Browser connect karo
- Intercept ON karo
- Requests capture karo
- Repeater me bhejo
- Parameters modify karo
- Responses analyze karo
Regular practice se hi real web pentesting understanding develop hoti hai.
Final Conclusion
Burp Suite beginners aur professionals dono ke liye ek essential cybersecurity tool hai. Community Edition se start karke aap web application security testing ki strong foundation build kar sakte hain.
Agar aap ethical hacking aur bug bounty journey start karna chahte hain, to Burp Suite seekhna sabse important practical step hai.