Practical Linux Commands for Ethical Hackers
Question -1
Part 1: File System Structure & Navigation
• Explore root directory using:
pwd
ls /
ls -l /
• Navigate into /etc, /var, /home and verify using pwd
• List contents of:
/bin
/boot
/dev
/proc
/tmp
• Practice absolute path navigation:
cd /var/log
• Practice relative path navigation:
cd log
cd ..
• Use navigation commands:
cd ~
cd –
cd ..
cd .
Take screenshots of all outputs.

Answer
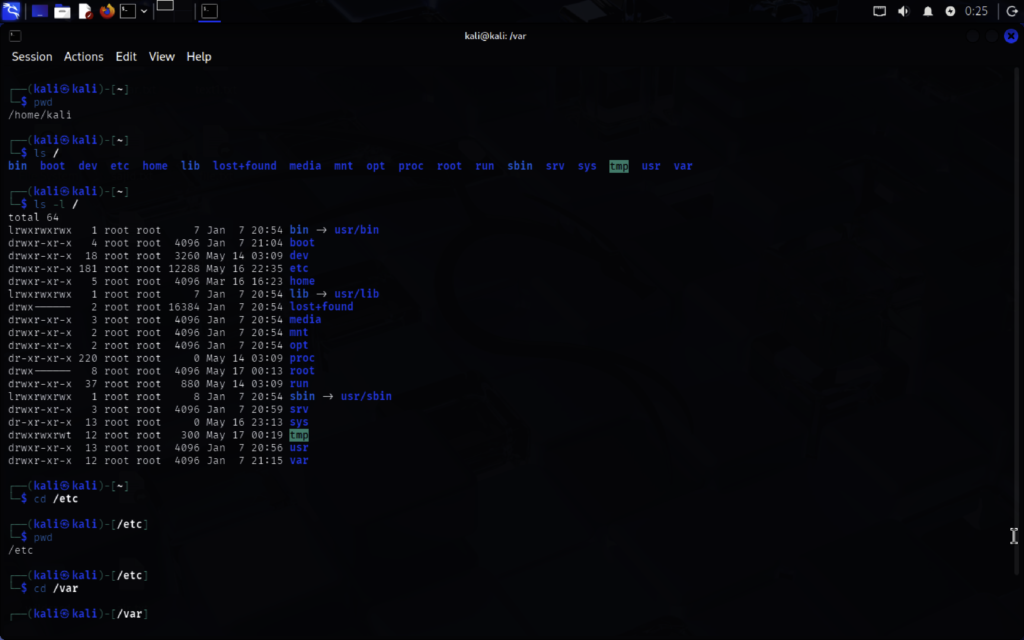
1. Current Directory Check — pwd
pwd
👉 इसका मतलब: Print Working Directory
यह बताता है कि आप अभी किस directory में हो।
Example:
/home/sajid
मतलब अभी आप /home/sajid folder में हो।
2. Root Directory Explore
Root क्या है?
Linux में सबसे ऊपर वाली directory / होती है।
इसे root directory कहते हैं।
Structure कुछ ऐसा होता है:
/
├── bin
├── etc
├── home
├── var
└── tmp
Root के अंदर क्या है देखें
ls /
👉 / के अंदर की directories दिखाएगा।
Example output:
bin boot dev etc home proc tmp var
Detailed List
ls -l /
👉 -l मतलब long format।
यह permissions, owner, size आदि दिखाता है।
Example:
drwxr-xr-x root root 4096 etc
3. Important Directories
/etc
System configuration files।
जाना:
cd /etc
pwd
/var
Logs, cache, variable data।
cd /var
pwd
/home
Users के personal folders।
cd /home
pwd
4. Important Folder Contents
/bin
Basic commands/programs।
ls /bin
/boot
Boot files।
ls /boot
/dev
Devices files।
ls /dev
/proc
Running process information।
ls /proc
/tmp
Temporary files।
ls /tmp
5. Absolute Path Navigation
Absolute Path क्या है?
पूरा path root / से शुरू होता है।
Example:
cd /var/log
👉 चाहे आप कहीं भी हो, सीधे /var/log में पहुँच जाओगे।
Check:
pwd
Output:
/var/log
6. Relative Path Navigation
Relative Path क्या है?
Current location से path।
अगर आप /var में हो:
cd log
👉 यह /var/log में ले जाएगा।
क्योंकि log current folder के अंदर है।
One Step Back — cd ..
cd ..
👉 एक directory पीछे जाता है।
Example:
/var/log
से
/var
7. Special Navigation Commands
Home Directory — cd ~
cd ~
👉 आपके home folder में ले जाएगा।
Example:
/home/sajid
Previous Directory — cd –
cd –
👉 पिछले location पर वापस जाता है।
Example:
cd /var
cd /etc
cd –
अब फिर /var में पहुँच जाओगे।
Current Directory — cd .
cd .
👉 Current directory ही रहती है।
. मतलब:
“यहीं”
ज़्यादा use scripts में होता है।
Quick Summary Table
| Command | Meaning |
| pwd | Current location दिखाओ |
| ls | Files/folders list |
| ls -l | Detailed list |
| cd folder | Folder में जाओ |
| cd .. | एक step पीछे |
| cd ~ | Home directory |
| cd – | Previous directory |
| cd . | Current directory |
Practice Example
pwd
ls /
cd /etc
pwd
cd /var
pwd
cd /var/log
pwd
cd ..
pwd
cd ~
cd –
cd .
Important Concept
/ vs ~
| Symbol | Meaning |
| / | Root directory |
| ~ | User home directory |
| . | Current directory |
| .. | Parent directory |
Question-2
Part 2: Creating & Removing Files and Directories
• Create directory:
mkdir linux_practice
• Create files:
touch file1.txt file2.txt file3.log
• Create multiple directories:
mkdir dir1 dir2 dir3
• Create nested directory using:
mkdir -p parent/child/grandchild
• Remove file using:
rm file3.log
• Remove directories using:
rmdir
rm -r
• Delete entire practice folder and verify removal.
Answer
1. Create Directory — mkdir
Command
mkdir linux_practice
👉 mkdir का मतलब:
Make Directory
यह linux_practice नाम का folder बनाएगा।
Verify करें
ls
Output:
linux_practice
2. उस Folder के अंदर जाएँ
cd linux_practice
Check location:
pwd
Example:
/home/sajid/linux_practice
3. Create Files — touch
Command
touch file1.txt file2.txt file3.log
👉 इससे 3 files बनेंगी:
- file1.txt
- file2.txt
- file3.log
Verify
ls
Output:
file1.txt file2.txt file3.log
4. Create Multiple Directories
Command
mkdir dir1 dir2 dir3
👉 एक साथ multiple folders बनेंगे।
Verify
ls
Output:
dir1 dir2 dir3
5. Create Nested Directory — mkdir -p
Command
mkdir -p parent/child/grandchild
👉 -p automatically parent folders बनाता है।
Structure बनेगा:
parent
└── child
└── grandchild
Verify
ls parent
Output:
child
6. Remove File — rm
Command
rm file3.log
👉 rm = remove file
Verify
ls
अब file3.log नहीं दिखेगी।
7. Remove Empty Directory — rmdir
Important
rmdir सिर्फ empty folder delete करता है।
Example
rmdir dir3
👉 अगर dir3 खाली है तो delete हो जाएगा।
8. Remove Non-Empty Directory — rm -r
Command
rm -r parent
👉 -r मतलब recursive।
यह पूरे folder structure को delete करेगा।
Verify
ls
अब parent folder नहीं दिखेगा।
9. Delete Entire Practice Folder
Step 1 — बाहर जाएँ
cd ..
Step 2 — Delete पूरा folder
rm -r linux_practice
👉 पूरा practice folder और उसके अंदर की सारी files delete हो जाएँगी।
10. Verify Removal
Command
ls
👉 अब linux_practice नहीं दिखना चाहिए।
Question-3
Task – Find, Locate & Copy Commands
Objective
Practice using find, locate, and cp commands to search and copy files and directories in Linux.
What You Need To Do
Create a directory structure for testing:
mkdir -p find_practice/dir1
mkdir -p find_practice/dir2
touch find_practice/file1.txt
touch find_practice/dir1/file2.txt
touch find_practice/dir2/file3.log
Use find to search for .txt files:
find find_practice -name “*.txt”
Use find with -type f:
find find_practice -type f -name “*.txt”
Update database and use locate:
sudo updatedb
locate file1.txt
Copy file using cp:
cp find_practice/file1.txt find_practice/dir1/
Copy file into another directory:
cp find_practice/dir1/file2.txt find_practice/dir2/
Copy directory recursively:
cp -r find_practice backup_find_practice
Verify copied files:
ls backup_find_practice
ls backup_find_practice/dir1
ls backup_find_practice/dir2
Show command history:
history
Take screenshots of:
- find results
- locate results
- Copied files verification
- Command history
Answer
Task – Find, Locate & Copy Commands (Linux)
इस task में आप सीखोगे:
- find → files search करना
- locate → जल्दी file search करना
- cp → files/folders copy करना
- history → पहले चले commands देखना
1. Create Directory Structure
Commands
mkdir -p find_practice/dir1
mkdir -p find_practice/dir2
touch find_practice/file1.txt
touch find_practice/dir1/file2.txt
touch find_practice/dir2/file3.log
Structure कैसा बनेगा?
find_practice
├── file1.txt
├── dir1
│ └── file2.txt
└── dir2
└── file3.log
Verify Structure
ls find_practice
ls find_practice/dir1
ls find_practice/dir2
2. Search Files Using find
Basic Find Command
find find_practice -name “*.txt”
👉 Meaning:
| Part | Meaning |
| find | search command |
| find_practice | कहाँ search करना है |
| -name | file name से search |
| “*.txt” | सभी .txt files |
Output Example
find_practice/file1.txt
find_practice/dir1/file2.txt
3. Find Only Files — -type f
Command
find find_practice -type f -name “*.txt”
👉 -type f मतलब:
सिर्फ files search करो
Difference
| Option | Meaning |
| -type f | files only |
| -type d | directories only |
4. Use locate Command
Step 1 — Update Database
sudo updatedb
👉 Linux locate database update करेगा।
Password माँग सकता है।
Step 2 — Search File
locate file1.txt
Example Output
/home/sajid/find_practice/file1.txt
Difference Between find and locate
| find | locate |
| Real-time search | Database search |
| Slow | Fast |
| Accurate current data | Old data हो सकता |
5. Copy File Using cp
Command
cp find_practice/file1.txt find_practice/dir1/
👉 file1.txt को dir1 में copy करेगा।
Verify
ls find_practice/dir1
Output:
file1.txt file2.txt
6. Copy File into Another Directory
Command
cp find_practice/dir1/file2.txt find_practice/dir2/
👉 file2.txt अब dir2 में भी copy हो जाएगी।
Verify
ls find_practice/dir2
Output:
file2.txt file3.log
7. Copy Entire Directory — cp -r
Command
cp -r find_practice backup_find_practice
👉 -r मतलब recursive copy।
पूरा folder copy होगा।
Structure After Copy
backup_find_practice
├── file1.txt
├── dir1
│ ├── file1.txt
│ └── file2.txt
└── dir2
├── file2.txt
└── file3.log
8. Verify Copied Files
Main Folder
ls backup_find_practice
dir1 Check
ls backup_find_practice/dir1
dir2 Check
ls backup_find_practice/dir2
9. Show Command History
Command
history
👉 Terminal में पहले चले सभी commands दिखेंगे।